Adventure Series: Components
A Component is the most used object in the Adventure library. In a nutshell, it represents any form of formatted text. They operate using a tree structure,
which means that if a root component is styled bold, unless a sub component says otherwise, it too will be rendered bold.
There is two primary ways of obtaining a Component:
- Using a
MiniMessagedeserializer. - Using one of the overloads of
Component.text(...). - Using the component builder:
Component.text().
Using MiniMessage
Section titled “Using MiniMessage”I personally always recommend deserializing from MiniMessage. It is a very versatile format which also allows for custom placeholders and other fun stuff. It furthermore allows you to easily put your message formats into a config, since you do not need to do any form of string concatenations.
The default MiniMessage (de)serializer can be obtained using MiniMessage.miniMessage().
In order to then retrieve a Component from a MiniMessage-serialized string, you need to use deserialize(String, TagResolver...).
The MiniMessage format is explained very extensively in Adventure’s own documentation. There are a lot of very interesting tags, like the
<translate> tag for client-side translations, but I will not be noting those down, since they are already documented well enough.
What I will be documenting here though are some of the useful quirks of this format. For once, they follow a tree like structure. That means the following strings lead to completely different results:
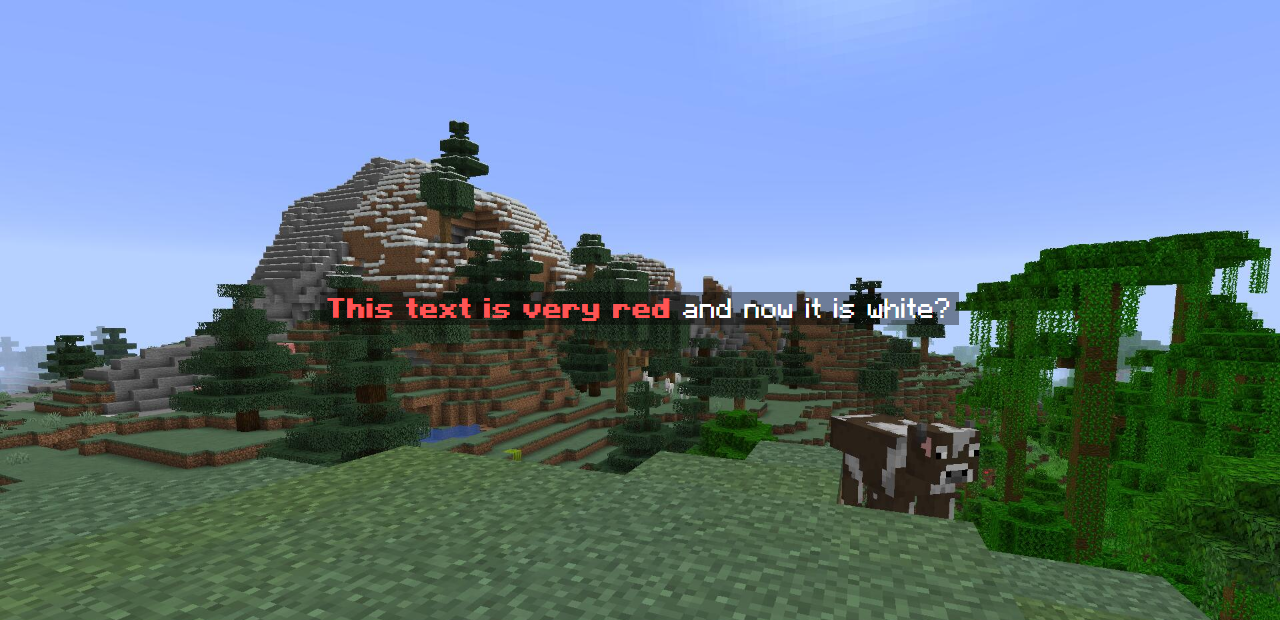
-
<bold><red>This text is very red</bold> and now it is white?
First string preview
-
<red><bold>This text is very red</bold> and now it is white?
Seconds string preview

This one isn’t actually white at the end.
You may or may not have noticed that the order in which you open and close tags matters. If an outside tag is closed, so are all inside tags. You can use this to your advantage if you need a section to be bold and colored, but the next one just white. Just close the first tag you opened!
But this can also oftentimes lead to confusion on why your text is incorrectly formatted. So keep this in mind! You can always check the output of your MiniMessage string on Adventure’s MiniMessage Viewer. That’s how I got the images for the previews!
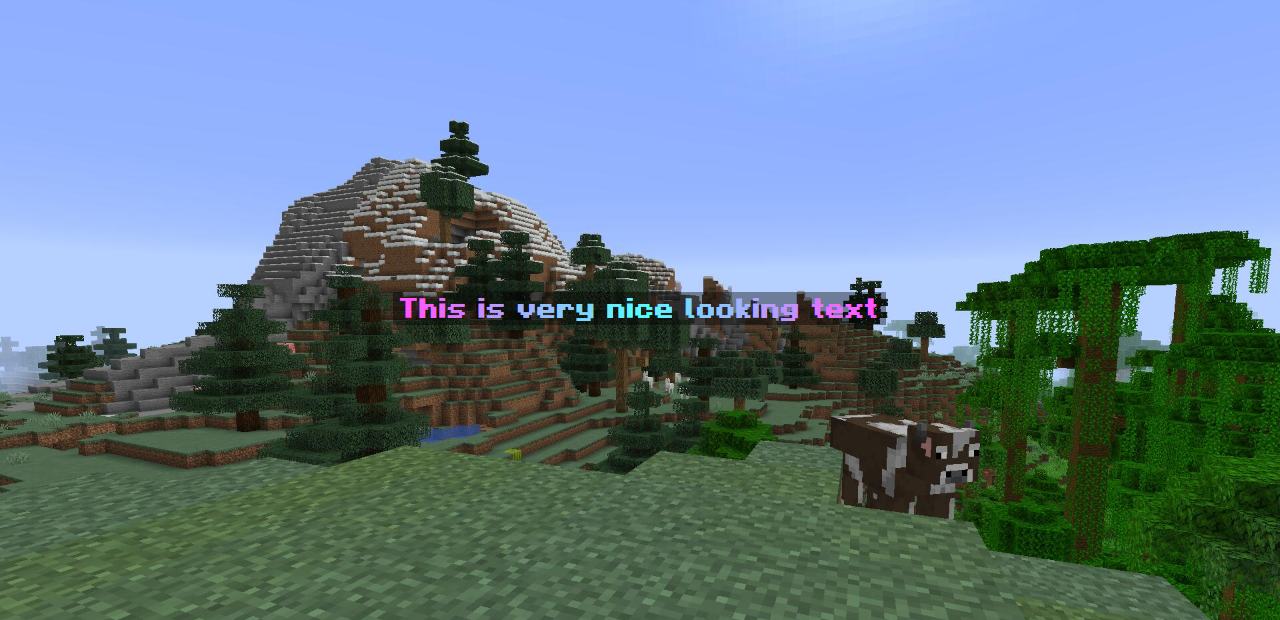
Another very interesting feature of MiniMessage, which I’d like to point out, is the <gradient> tag. This tag accepts any amount of of the 16 predefined colors or any
custom hex-based colors and renders the content in a gradient of those colors.
<b><gradient:light_purple:aqua:light_purple>This is very nice looking textGradient preview
Creating simple components
Section titled “Creating simple components”Very simple components can be created using the countless overloads of Component.text(...). These take in either a
primitive value or a String or Object and return a Component with no styling; just the parameter input input.
Furthermore, you can even create components which are translated on the client using
Component.translatable(Translatable). For example, to display a diamond sword in the
client’s language, you can use this component:
final Component translated = Component.translatable(ItemType.DIAMOND_SWORD);Another useful component type is a key bind component. Those can be obtained using Component.keybind(String). For example, to display the key bind for jump, you would write this code:
final Component jumpBind = Component.keybind("key.jump");All components can be styled! That means you can apply a custom color (using #color(TextColor))
or a text decoration (using #decorate(TextDecoration)).
Furthermore, you can add click and hover events to Components. Anything that extends HoverEventSource can be used as a hover event provider
and anything that extends ClickEvent can be used as a click event provider.
As example, to create a component which displays an item when hovered over, and if clicked, gives the player that same item, the following code can be used:
final ItemStack itemStack = ItemType.DIAMOND_PICKAXE.createItemStack(meta -> { meta.displayName(miniMessage().deserialize("<!i><light_purple><b>Pickaxe")); meta.lore(List.of(miniMessage().deserialize("<!i><dark_gray>» <gold><b>Legendary Pickaxe")));});
final Component hoverAndClick = itemStack.getItemMeta().displayName() .hoverEvent(itemStack) .clickEvent(ClickEvent.callback(audience -> { if (!(audience instanceof Player player)) { return; }
player.give(itemStack); }));In-game preview
Building components in code
Section titled “Building components in code”The main way to build components is using the TextComponent.Builder obtainable
from Component.text().
The first MiniMessage string mentioned above can be build using the builder like this:
final Component component = Component.text() .append(Component.text("This text is very red") .decorate(TextDecoration.BOLD) .color(NamedTextColor.RED) ) .append(Component.text(" and now it is white?")) .build();The second MiniMessage string would be build like this:
final Component secondComponent = Component.text() .color(NamedTextColor.RED) .append(Component.text("This text is very red") .decorate(TextDecoration.BOLD) ) .append(Component.text(" and now it is white?")) .build();Notice the highlighted line. Instead of putting the red color onto the first appended component, we instead apply it to the root component. And since the second appended component doesn’t specify a color by itself, it just inherits the root component’s color. This hopefully also makes it a bit more clear on what the difference between the two MiniMessage strings in the section above is.
Gradients?
Section titled “Gradients?”Due to the way gradients work, there is no easy way to create gradients using the TextComponent.Builder.
Gradients are basically just a lot of one-character components which each have slightly different colors from each other to look like a smooth color gradient.
So you should definitely stick to MiniMessage if you want gradient support.
Learn Paper Dev is licensed under CC BY-NC-SA 4.0