Project Setup
In order to start writing plugins, we first have to setup our project and our IDE. Most people use IntelliJ IDEA as their primary IDE. It provides all tools and plugins necessary for efficient Java development and also provides native support for our build tooling, Gradle, which is also the suggested build tool by the PaperMC team.
Installation
Section titled “Installation”It is not necessary to install both Gradle and IntelliJ together, as IntelliJ includes Gradle. But if you prefer to setup projects using a CLI (Command Line Interface), you can also install Gradle separately.
Main article: https://www.jetbrains.com/help/idea/installation-guide.html
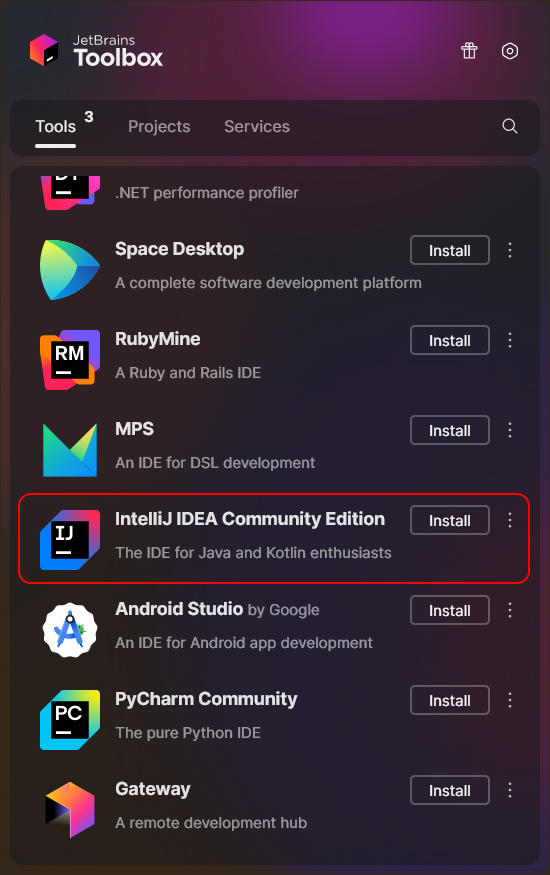
I personally recommend installing IntelliJ via the JetBrains Toolbox App, as it allows quick and easy updates of IntelliJ.
Once you have installed the JetBrains Toolbox App, you will want to install IntelliJ IDEA Community Edition.
JetBrains Toolbox App
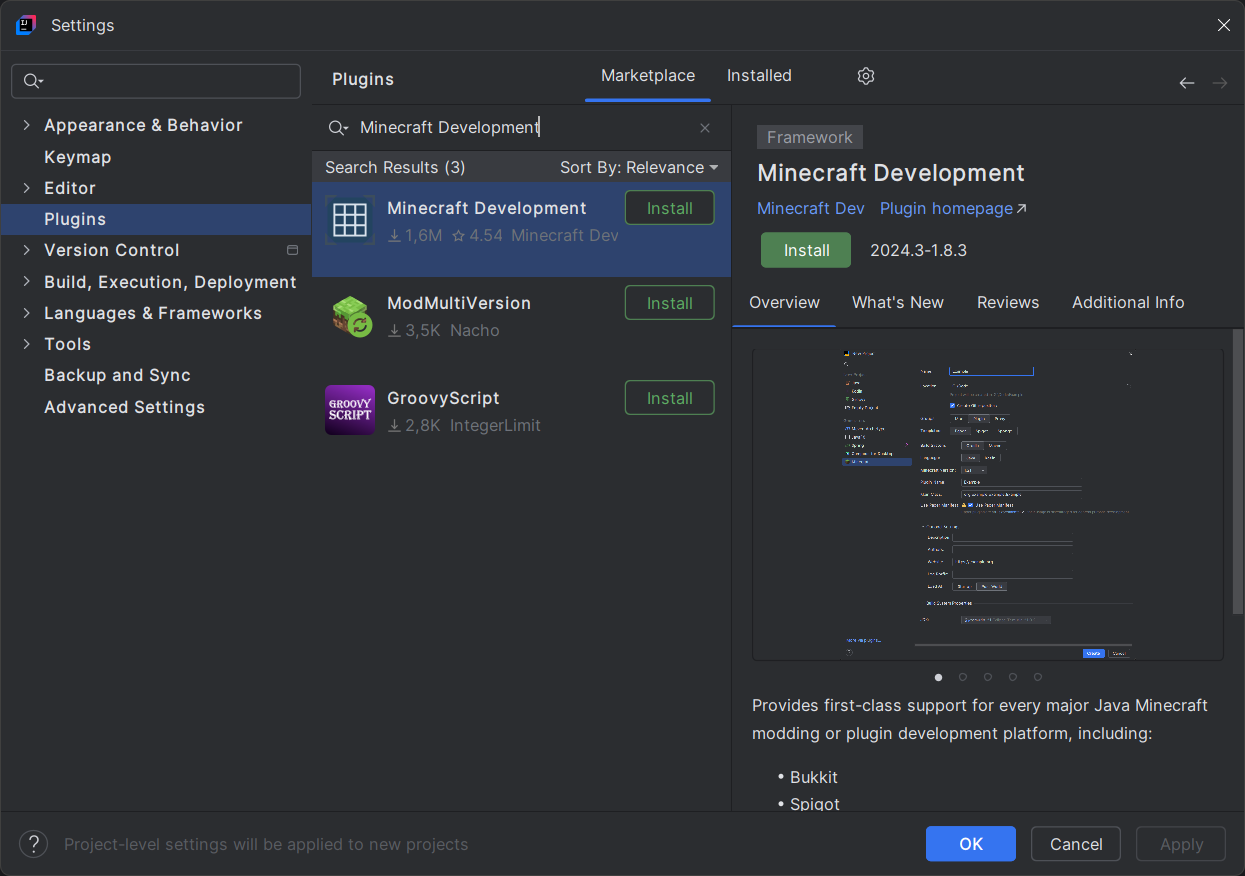
After you have installed IntelliJ, you should open it and then open the settings screen by pressing CTRL + ALT + S. Navigate to the Plugins tab and
install the Minecraft Development plugin. The plugin provides many useful QoL features for both plugin and mod devs.
Installing the Minecraft Development plugin
Main article: https://gradle.org/install/
On Windows, you first want to download the latest Gradle distribution. It is enough for you to just download the binaries.
Once you have done that, you will should unpack the zip into a new folder: C:\Program Files\Gradle. The file tree should look like this:
Directory
C:\Program Files\GradleDirectorygradle-8.13
Directorybin/
- …
Directoryinit.d/
- …
Directorylib/
- …
- LICENSE
- NOTICE
- README
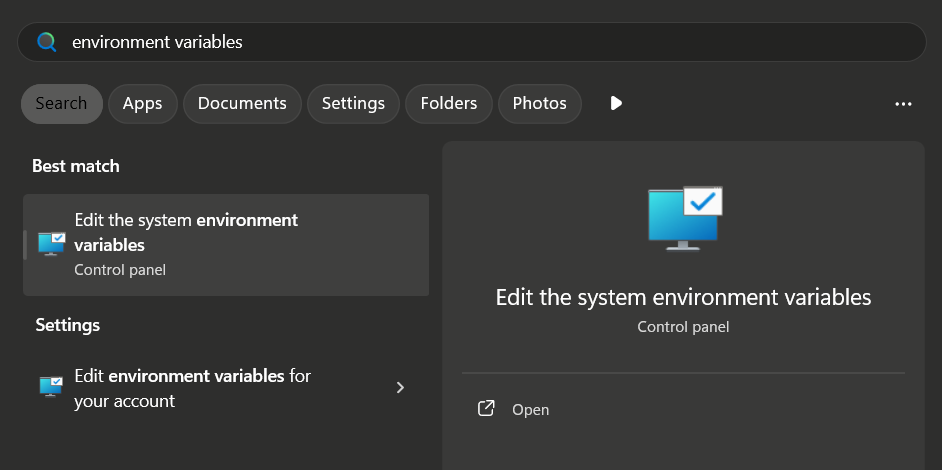
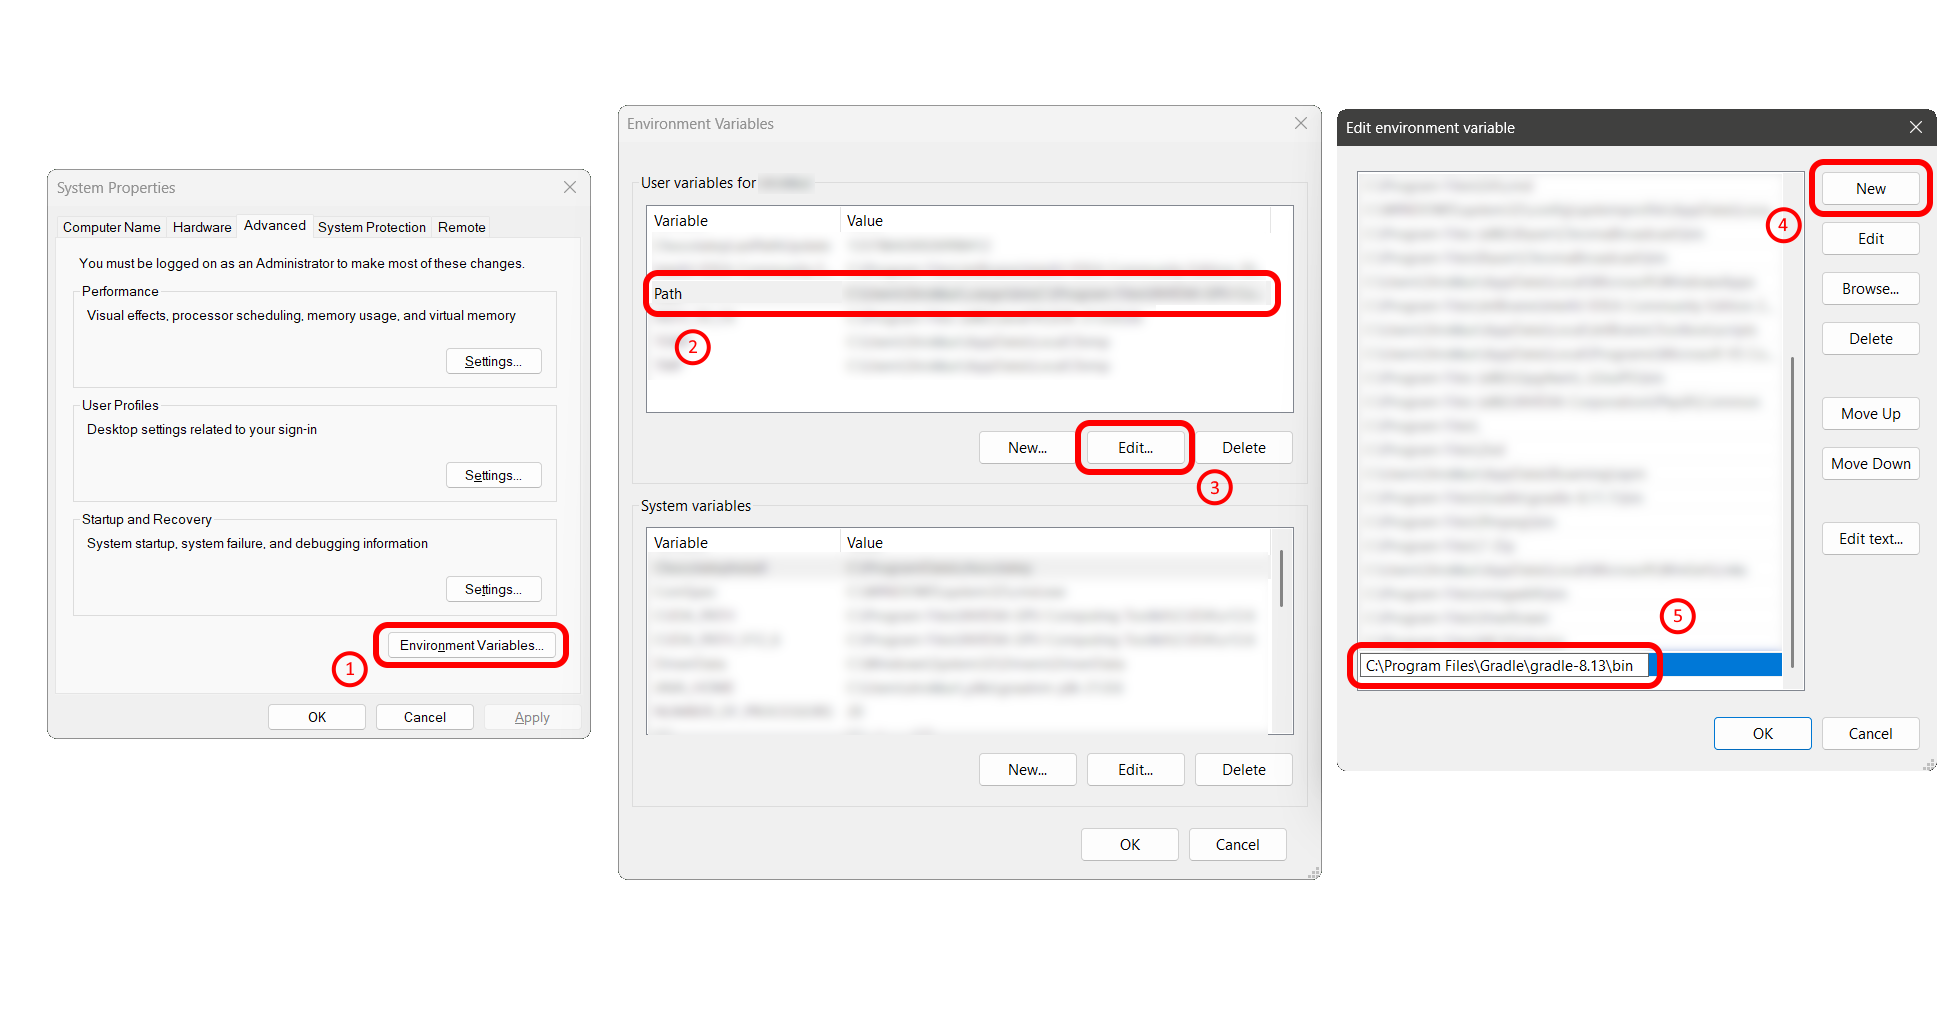
After this, you want to add a new Path environment variable entry. For this you can just search for environment variables in the start menu and open the first entry.
Environment variables in the start menu
You will then want to add an entry into your Path, pointing to C:\Program Files\Gradle\gradle-8.13\bin.
-
Click on
Environment Variables...in the bottom right. -
In the user variables, select the
Pathvariable. -
Click
Edit... -
Click
Newto add a new entry -
Paste
C:\Program Files\Gradle\gradle-8.13\binand clickOK
Visual Preview
If you have done these steps correctly, you might have to close all open terminal processes for it to take effect.
Now, you can run gradle -v in a new terminal session to verify your installed Gradle version.
C:\>gradle -v
------------------------------------------------------------Gradle 8.13------------------------------------------------------------
The recommended way to install Gradle on Linux is using SDKMAN!, which also allows for managing multiple JDK installations:
$ curl -s "https://get.sdkman.io" | bashAfter you have installed SDKMAN!, you can now install Gradle.
$ sdk install gradle 1.13Now, you can run gradle -v in the terminal to verify your installed Gradle version.
$ gradle -v
------------------------------------------------------------Gradle 8.13------------------------------------------------------------
Creating a new project
Section titled “Creating a new project”When creating a new project with IntelliJ, you will want to create a Java project. After that, you can fill out most fields however you want. Here is a quick breakdown of what each field does:
| Field Name | Usage |
|---|---|
| Name | This is the name of your project/plugin. I will be putting in BeginnerPlugin. |
| Location | Where the project will be located. I usually put my projects under C:\Dev\ (~/dev/ when on Linux). |
| 🔳 Create Git repository | Whether to initialize a git repository. You have to install git for this to work. |
| Build system | We will be using Gradle throughout this whole guide. |
| JDK | Make sure to choose/install JDK 21, as that is the version required for developing plugins past version 1.20.5. |
| Gradle DSL | We will be using Kotlin, so make sure to choose that. |
| 🔳 Add sample code | Whether to include some basic starter code files. You should disable this, as we will be building everything up from the ground. |
| Gradle distribution | You should choose Wrapper as that allows your project to be build from the command line even without having Gradle installed. |
| Gradle version | It is good practice to keep this up-to-date. Make sure to choose at least 8.12. |
| GroupId | This is essentially an unique identifier for your projects. It typically represents a domain in the reverse order. You may choose any group id, but it is good practice to choose one where you also own the domain. |
| ArtifactId | This setting doesn’t affect anything with plugin development. You can just set it to your project name. |
IntelliJ New Project Window

The project files should look like this now:
DirectoryBeginnerPlugin
Directory.gradle/
- …
Directory.idea/
- …
Directorygradle/
- …
Directorysrc
Directorymain/
- …
Directorytest/
- …
- build.gradle.kts
- gradlew
- gradlew.bat
- settings.gradle.kts
You can safely delete the src folder for now, as it contains stuff which we do not need yet.
When creating a new project with the Gradle CLI, you first want to create the directory, in which you want to create the project, and then run gradle init.
$ mkdir BeginnerPlugin$ cd BeginnerPlugin$ gradle initIt then will ask a few questions, in which you will want to choose 4, BeginnerPlugin, 1, and no respectively:
Select type of build to generate:  1: Application  2: Library  3: Gradle plugin  4: Basic (build structure only)Enter selection (default: Application) [1..4] 4
Project name (default: BeginnerPlugin): BeginnerPlugin
Select build script DSL:  1: Kotlin  2: GroovyEnter selection (default: Kotlin) [1..2] 1
Generate build using new APIs and behavior (some features may change in the next minor release)? (default: no) [yes, no] no

> Task :initLearn more about Gradle by exploring our Samples at https://docs.gradle.org/8.13/samples
BUILD SUCCESSFUL in 30s1 actionable task: 1 executed
Now, you should have a very basic build structure, which should look something like this:
DirectoryBeginnerPlugin
Directorygradle/
- …
- .gitattributes
- .gitignore
- build.gradle.kts
- gradle.properties
- gradlew
- gradlew.bat
- settings.gradle.kts
You can now safely open this project with IntelliJ IDEA or any other IDE/code editor of your choice.
Finishing the project setup
Section titled “Finishing the project setup”We may have created the project now, but we are not done yet! There is still a few things missing. For once, our build.gradle.kts file doesn’t contain anything
particularly useful. You should replace all of the content in it with the following:
plugins { id("java")}
group = "com.learnpaperdev.beginner" // Replace with your own idversion = "1.0-SNAPSHOT" // Our project version
repositories { // You can declare remote repositories here}
dependencies { // You can declare dependencies here}Setting up Gradle
Section titled “Setting up Gradle”You may be wondering: “What are dependencies and where do we get them from?” Basically, a dependency is just another Java project, which you compile against. That means you can use their
code inside your own code. There are multiple types of dependencies, but the only relevant one for us for now is a compile-time-only dependency, which means that the other’s code is not
included in our own. You will learn more about how this exactly works later, but for now, we will only be using compileOnly(...).
Furthermore, there is two main ways on how you can depend on an other’s code. The first is using a local file dependencies — that means you just include their compiled or source code in your project. You can declare a file dependency like this:
dependencies { compileOnly(files("path/to/dependency/file", "other/path", "..."))}The second possible dependency is a remote dependency, which is downloaded from the internet. Those are declared like this:
dependencies { // v Maven Coordinates v compileOnly("group.io:project-id:version")}The notation inside the compileOnly(...) function is called maven coordinates. In simple terms, you could say that the group.io refers to “who”, the project-id to “what”,
and the version to the version.
If we want to compile against the Paper API, we have to declare our dependency like this:
dependencies { compileOnly("io.papermc.paper:paper-api:1.21.4-R0.1-SNAPSHOT")}As said before, io.papermc.paper refers to the group id of Paper, paper-api is the project id of the Paper API, and 1.21.4-R0.1-SNAPSHOT is the version of the server we will primarily
be compiling against (1.21.4). The -R0.1-SNAPSHOT part is something that has been part of the version for a really long time from way before Paper times. It has its reasons, but there
is not need to go into detail on that for now.
If you were to try to compile the project right now, it would still not include the Paper API, as Gradle doesn’t know where to look — the internet is huge after all. For this we have the
repositories block. Here, we declare all paths where Gradle should look for dependencies.
Paper’s repository is referred to with https://repo.papermc.io/repository/maven-public/. If we add this as an repository to our build file, our Paper API dependency will be found. That would look like this:
repositories { maven("https://repo.papermc.io/repository/maven-public/")}The finished build.gradle.kts
Section titled “The finished build.gradle.kts”Your build file should look like this now:
plugins { id("java")}
group = "com.learnpaperdev.beginner" // Replace with your own idversion = "1.0-SNAPSHOT" // Our project version
repositories { maven("https://repo.papermc.io/repository/maven-public/")}
dependencies { compileOnly("io.papermc.paper:paper-api:1.21.4-R0.1-SNAPSHOT")}Setting up our source files
Section titled “Setting up our source files”Currently, there are no Java-source files in our project. We add those inside the src/main/java directory. You should create that directory now.
The file structure should look like this:
DirectoryBeginnerPlugin
Directorysrc
Directorymain
Directoryjava/
- …
- build.gradle.kts
- …
What is the reason for this obscure structure? What do you need main for? And why an explicit java directory? Well, the reason for the main directory is that you can also have
stuff under src/test, which is typically the directory with all your unit test. This just helps separate files which should be compiled into the final output file from the test files.
And the reason for the explicit java directory is that you can also code plugins in other languages! There is a lot of other JVM-based languages, like Groovy or Kotlin. Those would
each have their own sub folder in the source folder. For example, for Kotlin you would choose src/main/kotlin.
Now, to create your first source file, we need even more directories. Inside the java directory, you should now create a few directories based on your group-id. In general,
you separate your group-id by its dots and make each of them a directory.
For example, for com.learnpaperdev.beginner, you would create the following directories:
DirectoryBeginnerPlugin
Directorysrc
Directorymain
Directoryjava
Directorycom
Directorylearnpaperdev
Directorybeginner/
- …
- build.gradle.kts
- …
The reason for this tedious amount of folders is so that we can effectively separate the files of different plugins. Imagine that Plugin A has these files in their src:
Directorysrc
Directorymain
Directoryjava
DirectoryAPlugin.java
- PluginUtils.java
And Plugin B has these files in their src:
Directorysrc
Directorymain
Directoryjava
DirectoryBPlugin.java
- PluginUtils.java
Now, both plugins declare a PluginUtils.java file. These may have different contents though. So how can the server, when loading both plugins, know which of these two PluginUtil.java
files one of the plugins references? The answer is: It just cannot. But if we separate them into different folders, each plugin will always be able to reference its specific one.
So yeah, now that you have created your folder structure, you can create your first source file: BeginnerPlugin.java. The empty source file should look like this:
// Again, replace with your own group id — this should match the folder structurepackage com.learnpaperdev.beginner;
public class BeginnerPlugin {}Compiling our project
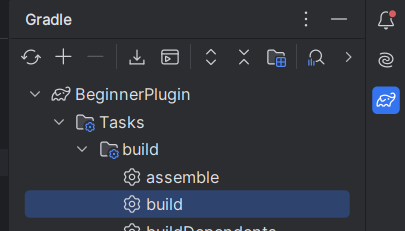
Section titled “Compiling our project”In the top of the sidebar in the right, notice the small Gradle (Elephant) icon. When you click on that, a menu should appear. When you now expand the entries BeginnerPlugin > Tasks > build you can see all of the tasks you can run. When you now double-click the build task, Gradle will now attempt to compile your plugin.
You can run .\gradlew build in the project’s root folder in order to compile your plugin.
>.\gradlew build
BUILD SUCCESSFUL in 614ms1 actionable task: 1 executed
You can run ./gradlew build in the project’s root folder in order to compile your plugin.
$ ./gradlew build
BUILD SUCCESSFUL in 614ms1 actionable task: 1 executed
If successful, you should find the compiled file under builds\libs\BeginnerPlugin-1.0-SNAPSHOT.jar.
DirectoryBeginnerPlugin
Directorybuilds
Directorylibs
- BeginnerPlugin-1.0-SNAPSHOT.jar
- …
Afterword 🚀
Section titled “Afterword 🚀”Finally, after a lot of steps, we got a project up and running! Yet, if you were to drop this into the plugins folder of a Paper server, it wouldn’t do anything. That is what we
will be tending to next. After all, this is a Paper plugin guide, and not an IntelliJ guide.
Learn Paper Dev is licensed under CC BY-NC-SA 4.0